Oops.... if the title matches your search, then i feel really bad for your situation. Because this is the worst thing that you can imagine and the least scenario which you expect to happen to your costly router. But dont panic. Here's a simple and easy steps for overcoming that problem. I have tried to put down the steps in most elaborate and sequential manner, as i couldnt find such step-by-step procedure anywhere to solve this problem (if you know any, please dont hesitate to include it in comments).
Product:
I have WGR614v9 Wireless Router with me. So, the following steps are tried and tested in WGR614 Router Family. But please note that this is applicable to all the latest Netgear Router Families. You can find your Router Product Version on the bottom label of your router.
Symptoms:
Your router is not working. It occurs mostly after upgrading router to latest version. And you find that the Power LED blinks every second.
Cause:
Your router firmware is corrupt. (Note: Firmware - is a computer program that is embedded in a hardware device) The major possibility for this to happen is when power supply is cut down while the router is getting upgraded to the latest version i.e. while firmware in your router is upgrading. As the upgradation of firmware takes few minutes, its always advised to make sure that the power supply to the router wont get interrupted during that time (max 5 mins).
Solution:
Now lets come to your current situation i.e. Power LED is blinking. Firmware got corrupted somehow. Here are the very simple steps to solve this problem:
1. Download the latest firmware.
When you're upgrading the firmware automatically while starting the router, then it might have already downloaded the latest version. If so, locate that file. The filename looks like this "WGR614v9-V1.1.0.19.chk"
If the file is not there, you can download the latest firmware by choosing your router product family here. (for downloading, you can connect your computer directly to your modem for direct internet connection). Since the supported firmware versions are of GNU General Public License "GPL", you can also get the code for those here. (Note: Please refrain from using unsupported firmwares like Tomato, etc. , which will lead you to more troubles , like WAP/WAP2 security cant be used, though they solve this problem.
2. Download TFPT Client.
Though your firmware is corrupt, the good news is that there's a TFTP server running on your router. This enables us to manually push the proper firmware to the router. For this purpose, you need to have TFTP client on your machine. There are lot of free/trial softwares which provides you tftp client, like FTPrush, WinAgents, etc. , I used and will recommend Tftpd32 for first time users. You can download the software here and install it in your machine.
3. Connect your computer to the router.
Now you can disconnect direct connection to the modem and connect the cable to any one of the slots at the back of your router. (Note: You can't use wireless means for upgrading the router.) you'll need the wired connection between your system and the router.
4. Change your computer's ip address to static one.
The default id address for your router is 192.168.1.1, in other words, your router runs the tftp server in the mentioned address. The present setting for your computer will be "Obtain an IP address automatically" and "Obtain DNS server address automatically", since you were connected to internet. So, change it to static address by following the navigation "Start > Control Panel > Network Connections", right click on "Local Area Connection", click on "Properties", under General tab, select "Internet Protocol [TCP/IP]", click on "Properties" button, select "Use the following IP address" radio button, enter the values for IP Address: 182.168.1.2, Subnet Mask: 255.255.255.0, Default Gateway: 192.168.1.1, select "Use the following DNS server addresses", enter the values for Preferred DNS server:192.168.1.1, Alternate DNS server:[leave it blank], click OK button in all the open windows for saving the settings.
Verify your settings by giving "ipconfig" in the command prompt, which should display the ipaddress as "192.168.1.2". Also verify the connection to the router by giving "ping 192.168.1.1" in cmd prompt, for which you should get successfull reply.
5. Upload the new firmware using tftp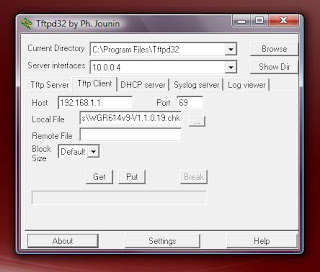
Launch your tftp client using the navigation "Start > All Programs > Tftp32 > Tftp32". Click on the "Tftp Client" tab, and enter the values for Host: "192.168.1.1", Port:"69", for the Local File value: browse and select the latest firmware file which we downloaded in Step 1, and Click on "Put" button. The transfer may take from few seconds to few mins. Once the file is uploaded to the router, it will take 2 to 5 mins for the router to get updated. Still if your Power LED does not stop blinking, then try disconnecting the power supply and connect it again. Now you'll see the Power LED in ON state (instead of blinking state).
Congrats.... Thats it. You have successfully crossed the hurdle.
Now you can connect the router with your modem, make the settings of your computer to "Obtain an IP address automatically" and "Obtain DNS server address automatically" by following the same process mentioned in Step 4, to allow your computer to connect automatically. Verify your internet connection now.
Product:
I have WGR614v9 Wireless Router with me. So, the following steps are tried and tested in WGR614 Router Family. But please note that this is applicable to all the latest Netgear Router Families. You can find your Router Product Version on the bottom label of your router.
Symptoms:
Your router is not working. It occurs mostly after upgrading router to latest version. And you find that the Power LED blinks every second.
Cause:
Your router firmware is corrupt. (Note: Firmware - is a computer program that is embedded in a hardware device) The major possibility for this to happen is when power supply is cut down while the router is getting upgraded to the latest version i.e. while firmware in your router is upgrading. As the upgradation of firmware takes few minutes, its always advised to make sure that the power supply to the router wont get interrupted during that time (max 5 mins).
Solution:
Now lets come to your current situation i.e. Power LED is blinking. Firmware got corrupted somehow. Here are the very simple steps to solve this problem:
1. Download the latest firmware.
When you're upgrading the firmware automatically while starting the router, then it might have already downloaded the latest version. If so, locate that file. The filename looks like this "WGR614v9-V1.1.0.19.chk"
If the file is not there, you can download the latest firmware by choosing your router product family here. (for downloading, you can connect your computer directly to your modem for direct internet connection). Since the supported firmware versions are of GNU General Public License "GPL", you can also get the code for those here. (Note: Please refrain from using unsupported firmwares like Tomato, etc. , which will lead you to more troubles , like WAP/WAP2 security cant be used, though they solve this problem.
2. Download TFPT Client.
Though your firmware is corrupt, the good news is that there's a TFTP server running on your router. This enables us to manually push the proper firmware to the router. For this purpose, you need to have TFTP client on your machine. There are lot of free/trial softwares which provides you tftp client, like FTPrush, WinAgents, etc. , I used and will recommend Tftpd32 for first time users. You can download the software here and install it in your machine.
3. Connect your computer to the router.
Now you can disconnect direct connection to the modem and connect the cable to any one of the slots at the back of your router. (Note: You can't use wireless means for upgrading the router.) you'll need the wired connection between your system and the router.
4. Change your computer's ip address to static one.
The default id address for your router is 192.168.1.1, in other words, your router runs the tftp server in the mentioned address. The present setting for your computer will be "Obtain an IP address automatically" and "Obtain DNS server address automatically", since you were connected to internet. So, change it to static address by following the navigation "Start > Control Panel > Network Connections", right click on "Local Area Connection", click on "Properties", under General tab, select "Internet Protocol [TCP/IP]", click on "Properties" button, select "Use the following IP address" radio button, enter the values for IP Address: 182.168.1.2, Subnet Mask: 255.255.255.0, Default Gateway: 192.168.1.1, select "Use the following DNS server addresses", enter the values for Preferred DNS server:192.168.1.1, Alternate DNS server:

Congrats.... Thats it. You have successfully crossed the hurdle.


 Posts
Posts

